Looking to build a natural retaining wall on a slope? Then this is the guide for you! Learn about Flex MSE, walk through the 7 easy steps in building a Flex MSE retaining wall, discover the many benefits of a natural retaining wall when compared to traditional systems, and find answers to frequently asked questions about the Flex MSE product.
What is Flex MSE?
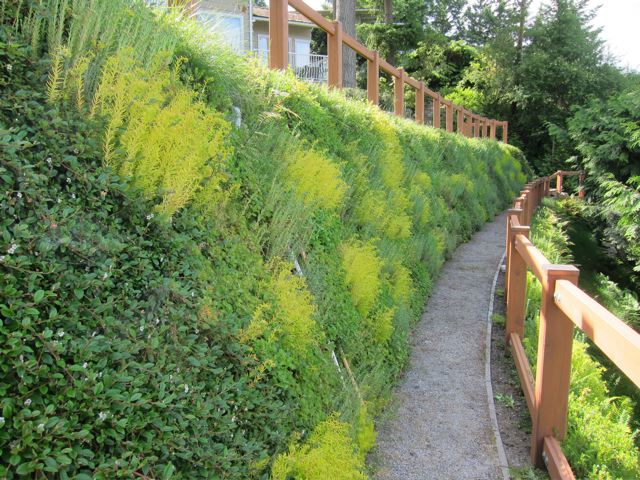
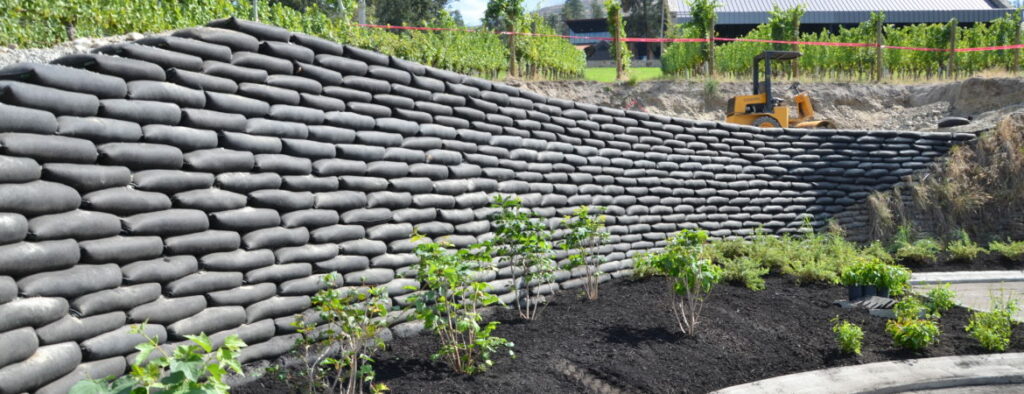
Flex MSE is a patented retaining wall system that leverages Mechanically Stabilized Earth (MSE) principles and geotextile technology to create strong block structures.
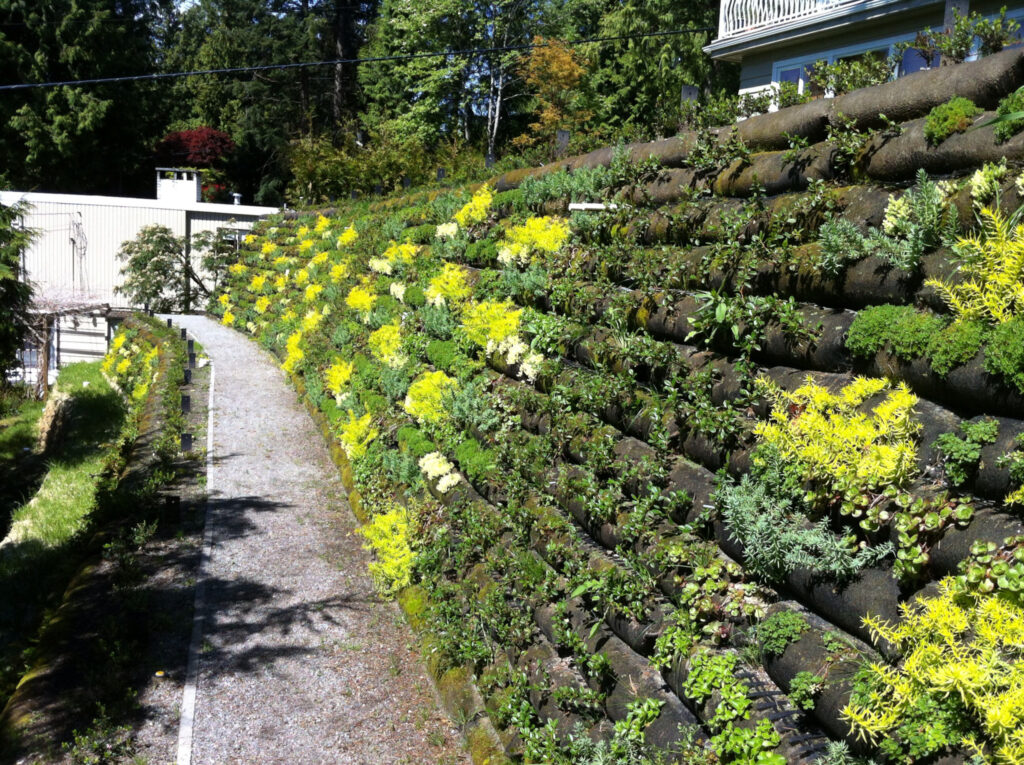
The geobags are installed in a wall formation and are then vegetated with grass, flowers, plants, and native shrubs for a natural and functional result.
Because of their solid but flexible nature, they can be installed to stabilize slopes, naturally aid your landscaping, reduce stormwater runoff at construction sites, and protect lake and stream banks from erosion, along with many other applications.
How to Build a Flex MSE Retaining Wall on a Slope: A 7-Step Process
Step 1 - Filling & Closing Flex MSE Bags
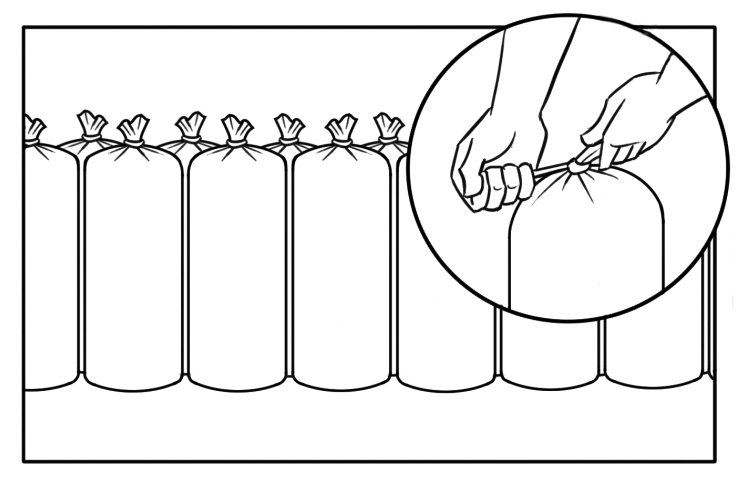
Fill the Flex MSE Bags with a mix of 70-80% clean granular soils and 20-30% high-quality organic materials by volume. If desired, add grass seed to the soil blend while mixing.
Uniformly fill the Bags to the top and seal them tightly with a standard zip tie.
- Other tight-seal options include re-bar ties, sewing, stapling, and hog rings.
Do’s and Don’ts
Don’t: Use clay or silt granular soils
Do: Use clean granular soils
Step 2 - Land Preparation
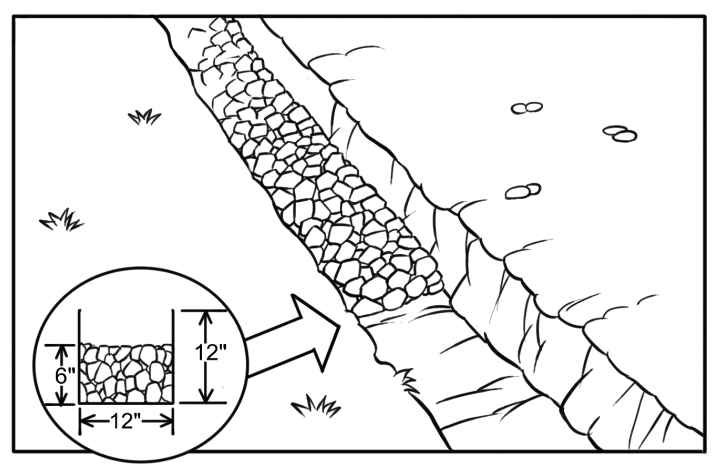
Dig a trench at least 12 inches deep and 12 inches wide to accommodate the length of your Flex MSE structure properly.
Next, add 6 inches of clean granular material to the trench for leveling. The trench is necessary for locking the base into place and protecting the structure from erosion.
NOTE: Taller or in-water structures may require deeper entrenchment, per a designing Engineer’s specification. For water applications, armoring the base layers of Flex MSE Bags with appropriate hard material is best practice.
Do’s and Don’ts
Don’t: Just start digging without thinking or planning
Do: Consult with an environmental engineer or call Before You Dig at 811 to have workers come out and mark buried utilities so you don’t accidentally disrupt them
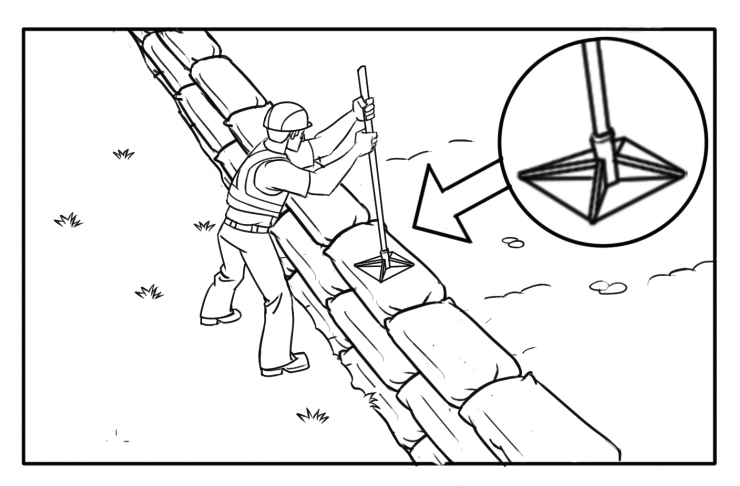
Step 3 - Place Flex MSE Bags & Interlocking Plate at the Base
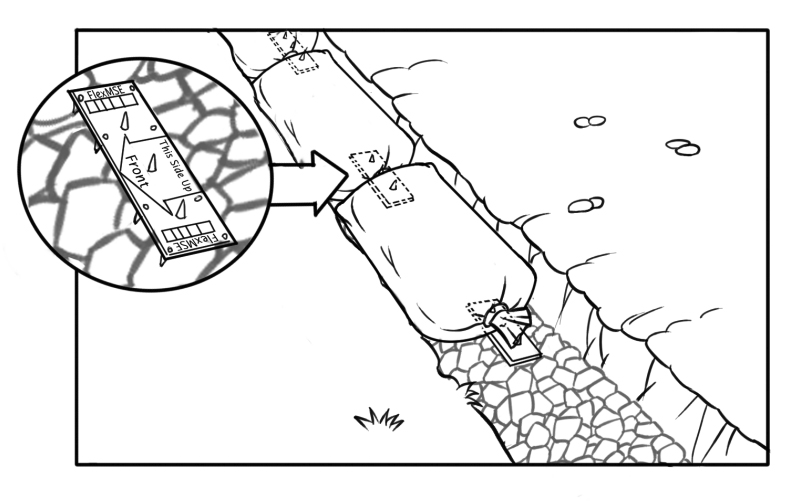
Certain applications may require Flex MSE interlocking Plates to be placed on the ground below the first row of Bags for additional support. If so, place the interlocking Plate so that you are reading “This Side Up” on the label and the Plate’s arrow points toward the front of your structure. Space the interlocking Plate to lie directly below each Bag’s joint (the Plates should end up being placed about 30 inches apart).
Next, Place the first row of Bags lengthwise in your trench, spacing them 1 inch between the ends of the Bags. Then, use a hand tamper or light compactor to flatten the Bag into the open spaces for leveling.
Do’s and Don’ts
Don’t: Overlap the Bags
Do: Space the Bags with 1 inch between the ends
Step 4 - Placing Subsequent Rows
Place a Flex MSE interlocking Plate over the joints of all Flex MSE Bags on each row.
NOTE: Offset each new row of Bags in a “running bond” pattern over the previous row so that the interlocking Plates and Bag joints lie below the middle of the Flex MSE Bag on top.
After placing the Bag with the desired setback, tamp or walk on top of the Bags to secure them onto the interlocking Plate.
NOTE: The Bag face may shift forward with compaction so monitor your setback as you build the structure.
Do’s and Don’ts
Don’t: Eyeball the placement of the Flex MSE Bags
Do: Use a batter board or another method of measurement to ensure that your angle is consistent
Step 5 - Geogrid Placement
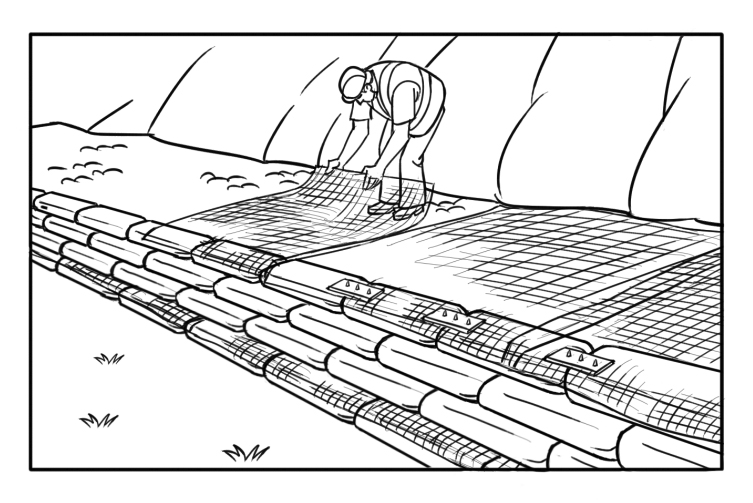
If any soil reinforcement is needed, lay the lengths of appropriate Geogrid from the front face of the Bags toward the back of the fill area.
Place the interlocking Plate over the Geogrid at the joints between the Flex MSE Bags. Pull the Geogrid snugly, removing any folds or wrinkles. Then lay the next layer of Bags, following Step 4, over the interlocking Plate and Geogrid.
Walk on or tamp the row to secure the Bag onto the Flex MSE Plate. Apply backfill soil from the front face of the structure to the back of the fill zone (this technique keeps the Geogrid flat and tightly connected to the face).
Do’s and Don’ts
Don’t: Place the Geogrid without considering the orientation of placement
Do: Orient the Geogrid in the correct direction of its strength
Step 6 - Backfilling & Compacting The Structure
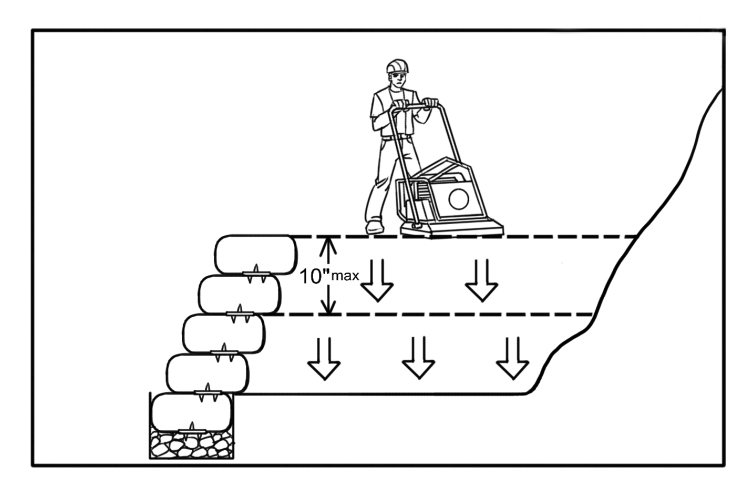
Backfill and compact the fill materials after every two rows of Bags. However, structures with a more gentle angle may require partial backfilling of every row to prevent the Bags from slumping back.
NOTE: Compaction should be done on no more than 10-inch thick layers of fill. A vibrating plate compactor is the recommended tool for compaction.
And in time, the vegetation will penetrate the Flex MSE Bag and grow into the backfill zone, further stabilizing the structure.
Do’s and Don’ts
Don’t: Use Organic or heavy clay backfill material because these materials hold excessive moisture and don’t compact properly
Do: Use backfill material that has the proper moisture content for optimum performance when compacting
Step 7 - Vegetation
There are a few different ways you can add vegetation to your Flex MSE structure including hydroseeding, preseeding, live staking, live planting, and brush layering.
- Hydroseeding – Hydroseeding, applying a mix of seed, mulch, fertilizer, and soil amendments on top of the Bags, is the most common vegetation method, being cost-effective and providing fast, consistent growth.
- Preseeding – Mixing grass seeds with the growing medium in the Bag is another method. The vegetation outcome varies depending on UV exposure and seed distribution in the medium.
- Live Staking – Live staking is the planting of tree branches that are cut while the trees are dormant. This method is often used in shoreline applications, erosion control sites, or when ‘rugged/wilder’ is the desired outcome. Live staking can be planted between Bag layers and into the backfill during placement or within the bags after placement.
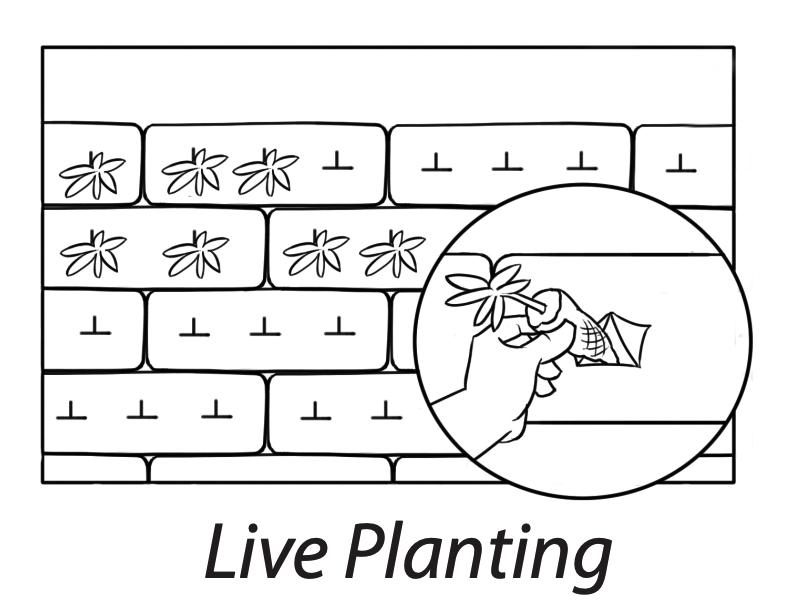
- Live Planting – Plants/plugs with smaller root balls (such as dune/beach grass) can be inserted directly into the Flex MSE Bag. When Live Planting the face of the installed Flex MSE unit, up to three inverted ‘T’ cuts 2-3 inches in width and height are permitted per Bag.
- Brush Layering – Similar to Live Staking between Bags, this method ties the root ball into the backfill behind the face of the Flex MSE system. Because of that, Brush Layering needs to be completed during Bag placement. When inserting plants, angle brush layers down into the fill or native material.
NOTE: If you plan to combine Hydroseeding and Live Planting, apply the hydroseed first to the outside of the Bags, then add live plant materials.
Do’s and Don’ts
Don’t: Start planting without the proper preparations
Do: Thoroughly saturate the structure prior to planting
Why Is a Natural Retaining Wall Better Than Traditional?
MSE walls are preferable to other retaining methods because of their natural solution to slope stabilization and erosion control. Flex MSE’s benefits include:
- Low Impact. Compared to traditional retaining walls, Flex MSE minimizes the impact of development on the environment by promoting the growth of vegetation and providing habitat for wildlife.
- Simplicity. Flex MSE requires minimal site prep and is easy to maintain.
- Sustainable. Walls are made of 50% recycled content, use 97% less Green House Gases when compared to concrete blocks, and can reuse native soils.
- Superior drainage. Flex MSE has a very high settlement tolerance and excess water drains quickly through the system, eliminating the need for chimney drains and pipes behind the wall.
- Flexibility. Flex MSE installs in tight spaces, like around tree roots and on top of bedrock. They can also be installed on poor soils or water-prone areas, and work well with any other wall-building or erosion control system.
- Value. Costs for Flex MSE are generally 40-50% less than other systems. They do not require intensive transportation and labor costs. They also install much quicker and are more customizable.
Long design life and warranty. Flex MSE has a design life of 120 years and carries a 75-year manufacturer’s warranty.
FAQs
Because of its lightweight nature and proven performance for extreme loading conditions, Flex MSE has a design life of 120 years and carries a 75-year manufacturer’s warranty.
Flex MSE is made from Polypropylene (PP). PP is one of the most stable, non-toxic, and durable plastics made. More specifically, the Flex MSE interlocking Plate is made with 100% recycled injection molded PP, while the GTX Bag is made with virgin Geotextile material.
Flex MSE is the only Vegetated Wall System that certifies its installers. And for larger projects, you will want to find certified Flex MSE installers. However, it is very simple to install. Smaller DIY projects are easy for homeowners to execute with little or no experience.
Costs for Flex MSE are generally 40-50% less than other systems. They do not require intensive transportation and labor costs, install much quicker and are more customizable than other systems, and have lower repair and maintenance costs.
Where Can I Find Natural Retaining Wall Services?
Lakeshore Customs is all about natural solutions. Because of that, we are proud, certified installers of the Flex MSE product. Have any questions about Flex MSE or our natural retaining wall services? Contact us, and we will be sure to get in touch soon!
We provide MSE wall installation in Michigan’s lower peninsula along the lakeshore and inland, including:
- Allegan, MI
- Benton Harbor, MI
- Fennville, MI
- Grand Haven, MI
- Grand Rapids, MI
- Hart, MI
- Holland, MI
- Kentwood, MI
- Manistee, MI
- Muskegon, MI
- Norton Shores, MI
- Pentwater, MI
- Rockford, MI
- Saugatuck, MI
- Shelby, MI
- South Haven, MI
- Walker, MI
- West Olive, MI
